
Interacting with HashiCorp Vault using Python
Discover how to set up HashiCorp Vault and interact with it using Python. We'll explore creating key-value engines and managing secrets programmatically. Beyond storing secrets, Vault offers dynamic secrets, encryption, and access management, making it a powerful security tool.

In the realm of data security, HashiCorp Vault emerges as a formidable tool for safeguarding sensitive information. Its primary role? To serve as a secure and encrypted repository for your most prized secrets. Whether you choose to manage it independently through the open-source option or opt for the convenience of HashiCorp Cloud Platform's SaaS solution, Vault stands as a reliable guardian of your data, ensuring confidentiality and integrity are upheld with every interaction.
The Vault HTTP API serves as a versatile gateway, granting comprehensive control over Vault's functionalities through simple HTTP requests. Whether you're delving into secrets management or tackling encryption tasks, this API opens the door to Vault's full potential. And for Python enthusiasts like myself, there's an added layer of convenience: a meticulously crafted Python SDK, complete with thorough documentation, streamlining interactions with Vault.
In this blog post, we'll embark on a journey to set up a self-managed instance of Vault, exploring how to seamlessly integrate Python for streamlined interaction with the platform.
Installation
We'll kick start our Vault journey by spinning up an instance using Docker. To achieve this, we'll craft a docker-compose.yml file to orchestrate the process:
version: "3.9"
services:
  hashicorp-vault:
    build: .
    ports:
      - "8200:8200"
    image: "vault:latest"
docker-compose.yml
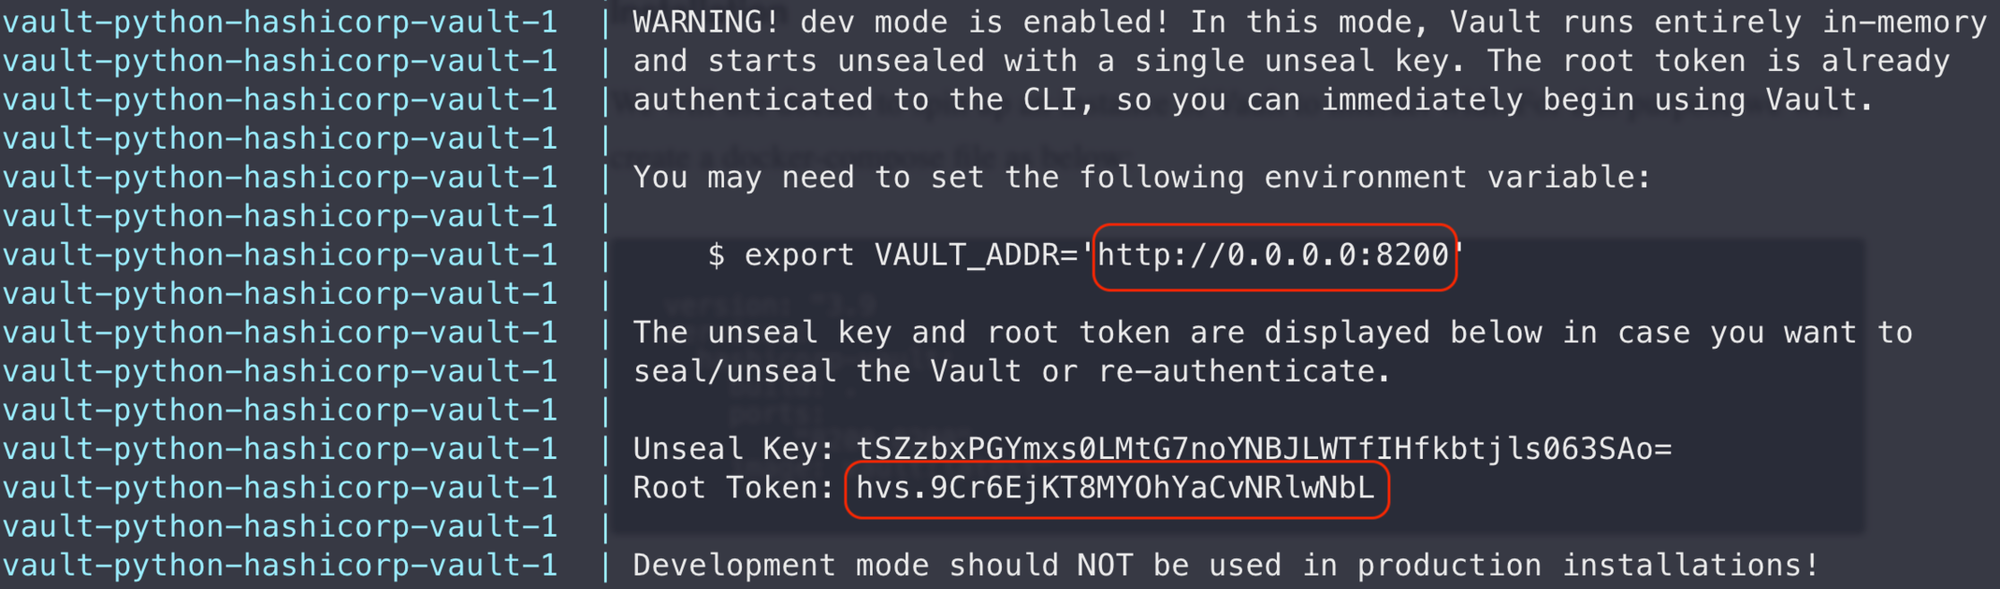
We'll initiate our Vault instance using the docker-compose up command, initiating the deployment process. Please be patient as this may require a few minutes to finalize. Upon completion, you'll find crucial details including the URL and Root Token nestled towards the conclusion of the logs, as illustrated below:
Note: As stated in the logs, it is not recommended to use the docker instance for production as it is not persistent. Meaning any secrets stored will be lost when you stop the docker. (You have been warned!!)
At this stage you should be able to browse to the Vault UI and login using the Root Token displayed at the tail end of the installation logs.
Interacting with Vault using Python
To seamlessly interact with Vault via Python, let's start by installing the Python SDK.
pip install hvacInstalling Python SDK
For authentication purposes, we'll utilize the Root Token obtained from the installation logs. Given the sensitive nature of this token, especially in the context of password management, we'll incorporate it as an environment variable. This practice ensures that we maintain the confidentiality of our secrets within the script, thereby mitigating any potential exposure risks.
export VAULT_URL="http://0.0.0.0:8200"
export VAULT_TOKEN="hvs.t6WQpRPXoBHxYTpL7e1hbF4B"
.env file
Following our setup, let's define a Python class and methods to create a key,value engine, create a password and read a password as outlined below:
import hvac
import os

class Hvac
  def __init__(self):
    self.url = self._get_url()
    self.token = self._get_token()
    self.client = hvac.Client(url=self.url, token=self.token)


  @staticmethod
  def _get_url():
    return os.getenv(key="VAULT_URL")


  @staticmethod
  def _get_token():
    return os.getenv(key="VAULT_TOKEN")

  # Method to create a new KV pair
  def create_kv_engine(self, engine_name):
    self.client.sys.enable_secrets_engine(
      backend_type="kv",
      path=engine_name,
      options={"version": "2"}
    )

  # Method to create a password
  def create_password(self, engine_name, username, password):
    self.client.secrets.kv.v2.create_or_update_secret(
      mount_point=engine_name,
      path=username,
      secret={"username": username, "password": password}
    )

  # Method to read an existing password
  def read_password(self, engine_name, username):
    return self.client.secrets.kv.v2.read_secret_version(
      mount_point=engine_name,
      path=username
    )
Python Class Definition
Subsequently, we'll initialize an object of the class, facilitating the establishment of a connection to our Vault instance.
>>> vault = Hvac()
>>> print(vault.client.is_authenticated())
>>> True
Authenticating with Vault
To create a new KV (key-value) engine, we call the create_kv_engine method from our class, passing in the desired engine name. Once the engine is set up, adding a password entry is just as straightforward. We use the create_password method, providing the engine name along with the username and password pair to be stored. The screenshot below demonstrates this process:
>>> vault.create_kv_engine(engine_name="test_engine")
>>>
>>> vault.create_password(engine_name="test_engine", username="test_user", password="test_password")
>>>
Create Vault Engine and Password
The result of these two calls is the creation of a new engine and a new key-value pair for the username and password.
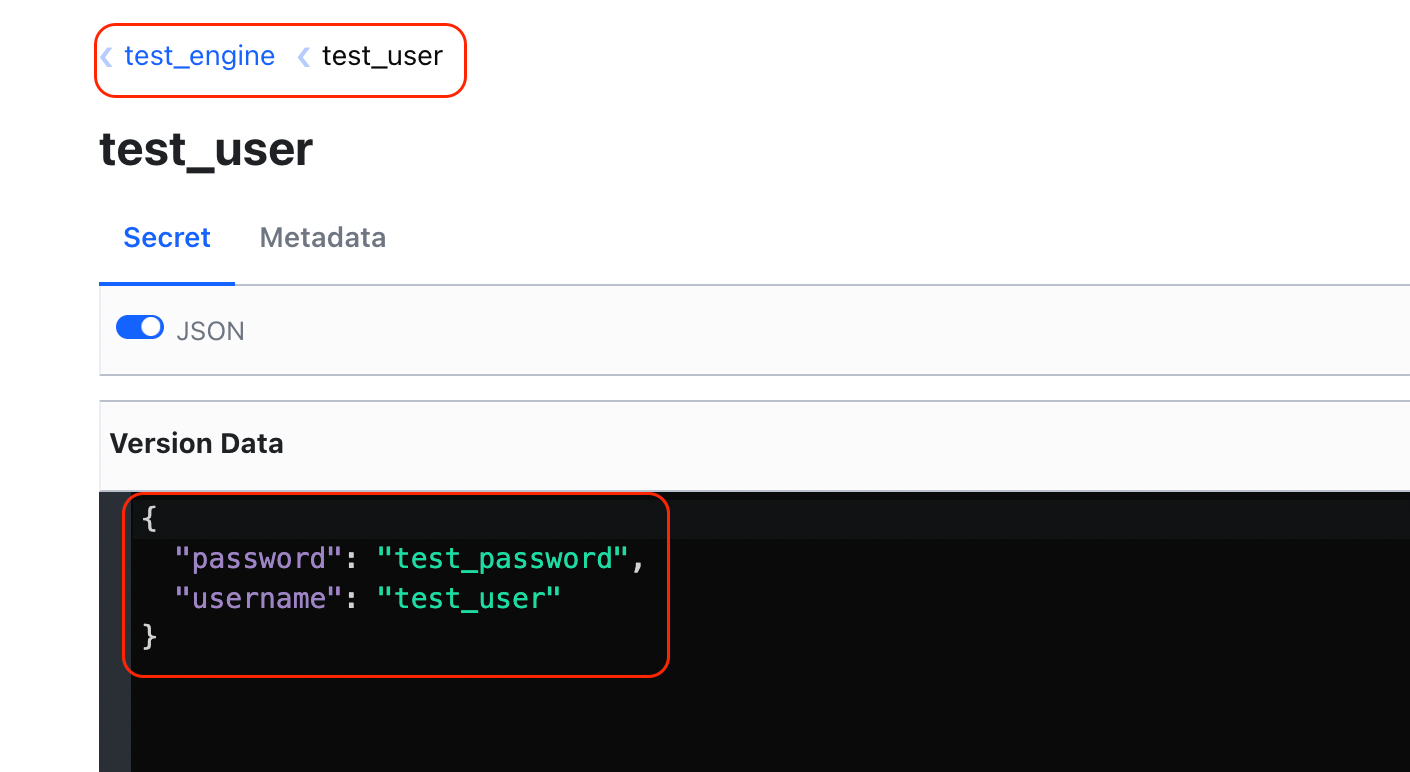
To access the password of an existing secret, we make a call to the read_password method defined in our class and pass to it the engine name and the username for which we are trying to extract the password.
>>> result=vault.read_password(engine_name="test_engine", username="test_user")
>>> print(result["data"]["data"])
{'password': 'test_password', 'username': 'test_user'}
>>>
Accessing password in Vault
Conclusion
The example above demonstrates using Vault as a secrets engine and interacting with it programmatically. However, Vault offers much more than just storing usernames and passwords in a key-value format. It's worth exploring its extensive capabilities, including dynamic secrets, data encryption, and access management.