Network Observability with SuzieQ: Part Two
Learn to set up Suzieq with Docker Compose for seamless network observability in a few simple steps!

In part One of this multipart series, we covered the introduction to SuzieQ and some of the features of SuzieQ. In this part, we will cover how to set up SuzieQ using Docker Compose. If you have not read Part One yet, I recommend you read it first before proceeding with this part.
Setting up SuzieQ using Docker Compose
Setting up SuzieQ with Docker Compose simplifies deployment and management. Docker Compose is a tool for defining and running multi-container docker applications using a single YAML file. We’ll use a pre-built SuzieQ Docker image from Docker Hub, maintained and regularly updated by the SuzieQ team, to ensure you have the latest features and improvements.
Prerequisites
Before we start, make sure you have the following installed on your machine:
- Docker
- Docker Compose
Initiate Your Suzieq Setup
We'll begin with creating necessary files and directories. This will include:
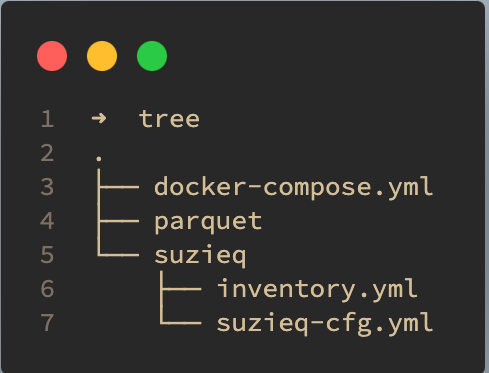
suzieq/: Directory to store configuration files for SuzieQparquet/: Directory to store the Parquet database for SuzieQdocker-compose.yml: File to define the services, networks, and volumes required for SuzieQsuzieq/suzieq-cfg.yml: File to contain the configuration for SuzieQsuzieq/inventory.yml: File to contain the inventory data for SuzieQ.env: File to contain the environment variables required for SuzieQ
 mkdir suzieq
 mkdir parquet
 touch docker-compose.yml
 touch suzieq/suzieq-cfg.yml
 touch suzieq/inventory.yml
 touch .env
Initiate setup
Your directory structure should look like this:

Populate the configuration and inventory files
Next, let’s populate the suzieq-cfg.yml, inventory.yml and .env files with the required configuration and inventory data.
Here is an example of how the suzieq-cfg.yml file might look:
 temp-directory: /tmp/
 data-directory: ./parquet

 rest:
     API_KEY: mysecret
     address: 0.0.0.0
     port: 8000
     logfile: /tmp/sq-rest-server.log
     logging-level: WARNING
     log-stdout: true
     no-https: true

 poller:
     logfile: /tmp/sq-poller.log
     logging-level: WARNING
     log-stdout: true
     period: 60

 coalescer:
     period: 1h
     logging-level: WARNING
     log-stdout: true

 analyzer:
     timezone: Australia/Melbourne
suzieq/suzieq-cfg.yml
And here is an example of how the inventory.yml file might look:
 devices:
     - name: devices-ignoring-known-hosts
       ignore-known-hosts: true

 sources:
     - name: test-devices
       hosts:
         - url: ssh://10.10.20.10
         - url: ssh://10.10.20.11
         - url: ssh://10.10.20.12

 auths:
   - name: logincreds
     username: admin
     password: env:LAB_PASSWORD

 namespaces:
   - name: testing
     device: devices-ignoring-known-hosts
     source: test-devices
     auth: logincreds
suzieq/inventory.yaml
And here is an example of how the .env file might look:
 LAB_PASSWORD=mysupersecretpassword
 API_ACCESS_TOKEN=mysecret # from the suzieq-cfg.yml file
.env
Fix permissions
Since the SuzieQ Docker image runs as a non-root user (suzieq), we need to ensure that the configuration files are accessible to the suzieq user. To do this, we need to first identify the user ID of the suzieq user and group ID of the suzieq group. You can do this by initializing a temporary container with the SuzieQ image and running the id command.
> docker run --rm -it netenglabs/suzieq:latest
suzieq@87cbeba35c2e:~$ id suzieq
uid=1000(suzieq) gid=1000(suzieq) groups=1000(suzieq)
suzieq@87cbeba35c2e:~$
Identify uid and gid
The output of the command will give you the uid and gid of the SuzieQ user. In this case, uid=1000 and gid=1000. You can then use these values to set the ownership of the configuration files.
 sudo chown -R 1000:1000 parquet
 sudo chown -R 1000:1000 ./suzieq/inventory.yml
 sudo chown -R 1000:1000 ./suzieq/suzieq-cfg.yml
Setting file permissions
Compose the docker-compose file
Next we'll write the docker compose file. Refer to the inline comments for explanation of each step
# Define a reusable service configuration for Suzieq
 x-suzieq_service: &suzieq_service
   image: netenglabs/suzieq:0.23.0  # Use the Suzieq Docker image version 0.23.0
   stdin_open: true  # Keep the standard input open to interact with the container
   tty: true  # Allocate a pseudo-TTY to the container
   environment:
     - TZ=Australia/Melbourne  # Set the timezone to Melbourne, Australia
   restart: unless-stopped  # Automatically restart the container unless it is explicitly stopped

 services:
   suzieq_poller:  # Define the Suzieq Poller service
     <<: *suzieq_service  # Inherit the configuration from x-suzieq_service
     container_name: suzieq_poller  # Name the container suzieq_poller
     command: -I /home/suzieq/inventory.yml -c /home/suzieq/.suzieq/suzieq-cfg.yml  # Command to run the poller with inventory and config    files
     env_file:
       - .env  # Load environment variables from the .env file
     user: 1000:1000  # Run the container with user ID 1000
     volumes:
       - "./parquet:/home/suzieq/parquet"  # Mount the local parquet directory
       - "./suzieq/inventory.yml:/home/suzieq/inventory.yml"  # Mount the inventory file
       - "./suzieq/suzieq-cfg.yml:/home/suzieq/.suzieq/suzieq-cfg.yml"  # Mount the config file
       - "./requirements.txt:/home/suzieq/requirements.txt"  # Mount the requirements file
     entrypoint:
       - sq-poller  # Use sq-poller as the entrypoint

   suzieq_rest:  # Define the Suzieq REST API service
     <<: *suzieq_service  # Inherit the configuration from x-suzieq_service
     container_name: suzieq_rest  # Name the container suzieq_rest
     command: -c /home/suzieq/.suzieq/suzieq-cfg.yml  # Command to run the REST API with the config file
     depends_on:
       - suzieq_poller  # Ensure suzieq_poller starts before this service
     environment:
       - FORWARDED_ALLOW_IPS=*  # Allow all forwarded IPs
     ports:
       - "8080:8080"  # Expose port 8080
     user: 1000:1000  # Run the container with user ID 1000
     volumes:
       - "./parquet:/home/suzieq/parquet"  # Mount the local parquet directory
       - "./suzieq/suzieq-cfg.yml:/home/suzieq/.suzieq/suzieq-cfg.yml"  # Mount the config file
     entrypoint: "sq-rest-server"  # Use sq-rest-server as the entrypoint

   suzieq_gui:  # Define the Suzieq GUI service
     <<: *suzieq_service  # Inherit the configuration from x-suzieq_service
     container_name: suzieq_gui  # Name the container suzieq_gui
     command: -c /home/suzieq/.suzieq/suzieq-cfg.yml  # Command to run the GUI with the config file
     depends_on:
       - suzieq_poller  # Ensure suzieq_poller starts before this service
     ports:
       - "8501:8501"  # Expose port 8501
     user: 1000:1000  # Run the container with user ID 1000
     volumes:
       - "./parquet:/home/suzieq/parquet"  # Mount the local parquet directory
       - "./suzieq/suzieq-cfg.yml:/home/suzieq/.suzieq/suzieq-cfg.yml"  # Mount the config file
     entrypoint:
       - suzieq-gui  # Use suzieq-gui as the entrypoint

   suzieq_cli:  # Define the Suzieq CLI service
     <<: *suzieq_service  # Inherit the configuration from x-suzieq_service
     container_name: suzieq_cli  # Name the container suzieq_cli
     command: -c /home/suzieq/.suzieq/suzieq-cfg.yml  # Command to run the CLI with the config file
     depends_on:
       - suzieq_poller  # Ensure suzieq_poller starts before this service
     user: 1000:1000  # Run the container with user ID 1000
     volumes:
       - "./parquet:/home/suzieq/parquet"  # Mount the local parquet directory
       - "./suzieq/suzieq-cfg.yml:/home/suzieq/.suzieq/suzieq-cfg.yml"  # Mount the config file
     entrypoint:
       - suzieq-cli  # Use suzieq-cli as the entrypoint

 volumes:
   parquet-db:
     driver: local  # Define a local volume for the parquet database
docker-compose.yml
Start the services
Once you have defined the services in the docker-compose.yml file, you can start the SuzieQ services using Docker Compose. Run the following command in the directory where the docker-compose.yml file is located:
root@sudarshan-devbox:/suzieq/suzieq# docker-compose up -d
Creating network "suzieq_default" with the default driver
Creating volume "suzieq_parquet-db" with local driver
Creating suzieq_poller ... done
Creating suzieq_cli    ... done
Creating suzieq_gui    ... done
Creating suzieq_rest   ... done
Starting the services
This command will start the SuzieQ Poller, REST API, GUI, and CLI services in detached mode. You can check the status of the services using the following command:
 root@sudarshan-devbox:/suzieq/suzieq# docker-compose ps
 Name                   Command               State                    Ports
 -------------------------------------------------------------------------------------------------
 suzieq_cli      suzieq-cli -c /home/suzieq ...   Up
 suzieq_gui      suzieq-gui -c /home/suzieq ...   Up      0.0.0.0:8501->8501/tcp,:::8501->8501/tcp
 suzieq_poller   sq-poller -I /home/suzieq/ ...   Up
 suzieq_rest     sq-rest-server -c /home/su ...   Up      0.0.0.0:8000->8000/tcp,:::8000->8000/tcp
 root@sudarshan-devbox:/suzieq/suzieq#
You can now access the SuzieQ GUI by navigating to http://localhost:8501 in your web browser. You can interact with the SuzieQ REST API by sending requests to http://localhost:8000. You can also use the SuzieQ CLI by running the following command:
docker attach suzieq_cliThis will attach your terminal to the SuzieQ CLI container, allowing you to interact with the CLI.
Troubleshooting
Troubleshoot issues by looking at the status of the containers and also the logs:
docker-compose ps # view status of the SuzieQ containers
docker-compose logs -f # tail logs for real-time updates
For more detailed troubleshooting, you could also look at the various log files in the suzieq_poller container
root@sudarshan-devbox:/suzieq/suzieq# docker exec suzieq_poller ls -al /tmp
total 12
drwxrwxrwt 1 root root  100 Jun 12 14:09 .
drwxr-xr-x 1 root root   40 Jun 12 14:09 ..
drwxr-xr-x 3 root root   25 Jun 12 14:09 .suzieq
-rw-r--r-- 1 root root  666 Jun 12 14:10 sq-coalescer.log
-rw-r--r-- 1 root root 2064 Jun 12 14:10 sq-poller-0.log
-rw-r--r-- 1 root root 1724 Jun 12 14:10 sq-poller-controller.log
root@sudarshan-devbox:/suzieq/suzieq#
Wrapping Up
In this part, we covered how to set up SuzieQ using Docker Compose. We created the necessary files and directories, populated the configuration and inventory files, fixed permissions for the configuration files, defined the services in the docker-compose.yml file, and started the SuzieQ services using Docker Compose. We also covered how to troubleshoot issues with SuzieQ by checking the logs of the services.
In the next part of this multipart series, we will cover how to interact with SuzieQ using the REST API. Stay tuned!


